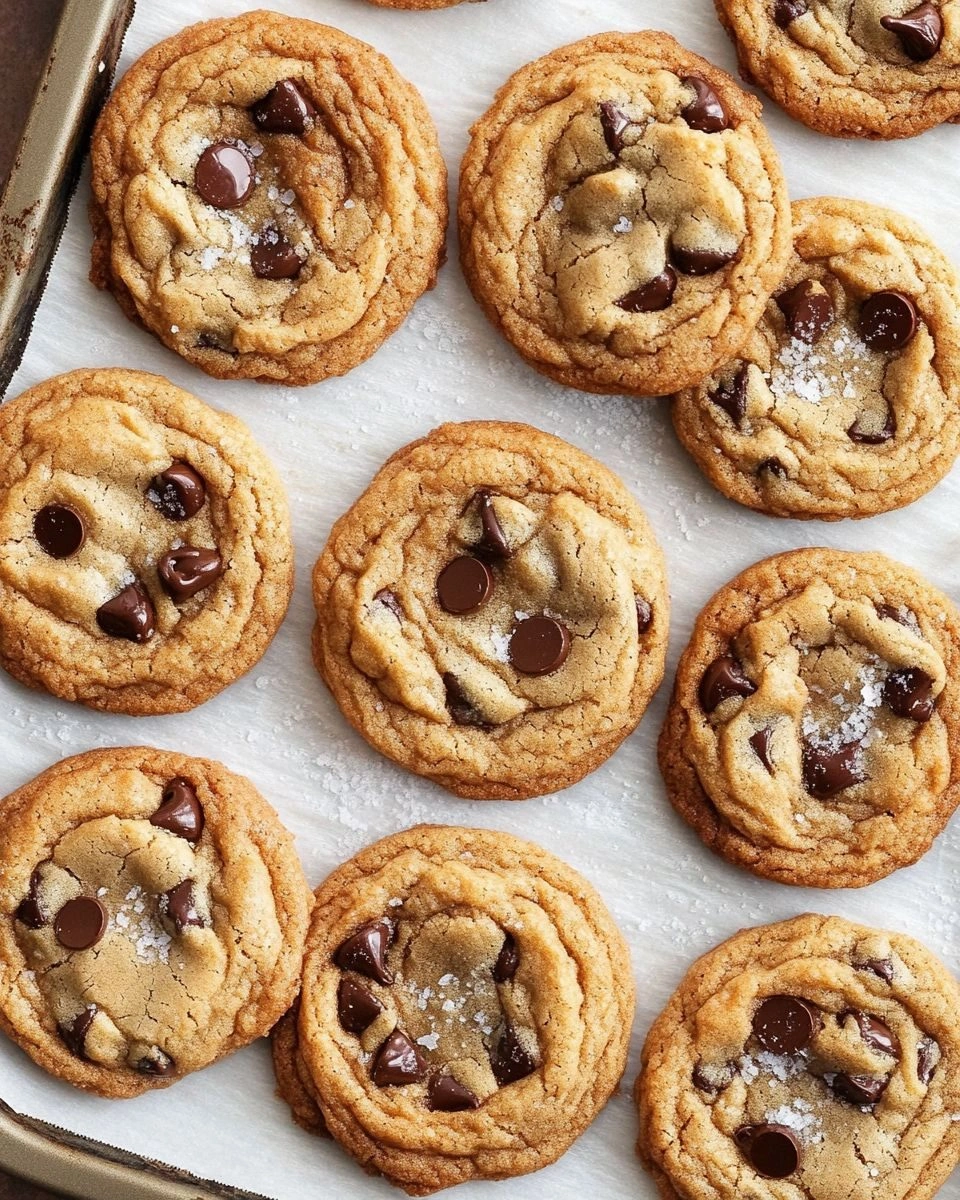
Picture this: you’re in a kitchen that smells like melted butter, sugar, and a hint of vanilla, and you’re about to pull a batch of cookies that will change the way you think about chocolate chips forever. I was halfway through a week of bland, store‑bought cookies when the idea hit me: what if the butter in the dough could be browned, turning the whole cookie into a caramel‑laden, nutty masterpiece? I dared myself to experiment, and what emerged was a cookie that not only satisfies the sweet tooth but also delivers a buttery depth that’s hard to find in the cookie aisle. The result? A golden‑brown, crunchy‑on-the-edges, melty‑inside cookie that I swear I could taste the buttery aroma even before I saw the first bite.
I’ll be honest—after the first bite, I ate a third of the batch before anyone else could even glance at the tray. That instant rush of buttered caramel and chocolate, the way the dough clung to the spoon, the crackle when the edges browned—every sensory cue was a revelation. If you’ve ever struggled with cookie dough that turns out too soft or too dry, you’re not alone; the trick lies in that simple, overlooked step of browning the butter. And the secret sauce? A touch of sea salt that brings out the chocolate’s richness like a spotlight on a stage.
Most recipes get this completely wrong. They either forget to brown the butter or add it too late, resulting in a cookie that’s either bland or too greasy. Here, the brown butter coats the flour, giving the dough a nutty aroma that’s almost cinematic, while the chocolate chips melt just enough to create pockets of gooey bliss. The texture is a symphony—crisp edges that shatter like thin ice, a chewy center that lingers, and a buttery finish that coats the tongue. I dare you to taste this and not go back for seconds. This is hands down the best version you’ll ever make at home.
Picture yourself pulling this out of the oven, the whole kitchen smelling incredible, and the first cookie already cracking under your fingers. That sizzle when the butter hits the pan? Absolute perfection. The aroma of browned butter mingles with chocolate, creating a scent that practically calls for a second plate. If you’re ready to replace your standard cookie routine with something that feels like a culinary revelation, let me walk you through every single step. By the end, you’ll wonder how you ever made it any other way.
What Makes This Version Stand Out
- Taste: The browned butter imparts a deep, nutty flavor that elevates the classic chocolate chip profile, turning each bite into a buttery, caramelized experience.
- Texture: Crisp, caramelized edges give way to a chewy, melt‑in‑your‑mouth center, creating a multi‑dimensional mouthfeel that’s hard to resist.
- Simplicity: Only a handful of ingredients, yet the technique transforms the cookie from ordinary to extraordinary with minimal extra steps.
- Uniqueness: The combination of browned butter and sea salt is a rare pairing that sets this recipe apart from standard chocolate chip cookies.
- Crowd Reaction: Friends who’ve tried this say it’s “the best chocolate chip cookie I’ve ever had” and keep asking for the recipe.
- Ingredient Quality: Using high‑quality chocolate chips and real butter (not margarine) ensures the richest flavor profile.
- Cooking Method: Browning the butter in a pan before mixing gives the dough a caramelized base that’s impossible to replicate with regular butter.
- Make‑Ahead Potential: The dough can be prepared up to 24 hours in advance, letting the flavors meld for an even deeper taste.
Alright, let’s break down exactly what goes into this masterpiece...
Inside the Ingredient List
The Flavor Base
All‑Purpose Flour: The backbone of the cookie, it gives structure and absorbs the browned butter’s oils. If you use a lower‑protein flour, the cookies may spread too much; stick with a standard 10‑12% protein flour for best results. Skipping the flour will turn the dough into a sticky mess that won’t bake properly.
Baking Soda: A leavening agent that reacts with the acidic brown sugar and butter, creating tiny pockets of air that give the cookie a light lift. If you replace it with baking powder, the cookies will be denser and may not brown as nicely.
Sea Salt: Adds a subtle, savory contrast that highlights the chocolate’s sweetness. A pinch of coarse salt on top before baking creates a dramatic visual and flavor pop. Without salt, the chocolate can taste flat.
The Texture Crew
Unsalted Butter: The primary fat source, it’s crucial to use unsalted so you control the salt level precisely. Butter that’s too soft will cause the dough to spread excessively; keep it at room temperature but not melted. Skipping the butter will leave the cookies dry and crumbly.
Brown Sugar: Contributes moisture and caramel notes, balancing the butter’s richness. If you swap for white sugar, the cookies will be crisper and lack the deep flavor. A mix of both gives a perfect balance.
White Sugar: Adds sweetness and helps with browning. Removing it will reduce caramelization, resulting in a less golden crust.
The Unexpected Star
Vanilla Extract: A fragrant boost that brings everything together. If you don’t have vanilla, a splash of almond extract can work, but it will change the flavor profile slightly. Skipping vanilla will leave the dough bland.
The Final Flourish
Chocolate Chips: The star that melts into pockets of gooey chocolate. Use high‑quality semi‑sweet or bittersweet chips for depth. If you prefer milk chocolate, the cookies will be sweeter but less complex.
Butter for Browning: The key to that nutty aroma—brown it until it turns a deep amber color and smells nutty. If you use too much butter, the dough can become greasy; keep it to the recommended amount. Skipping this step will make the cookies taste like plain butter.
Everything's prepped? Good. Let's get into the real action...
The Method — Step by Step
- Heat a medium saucepan over medium heat. Add 2 tablespoons of unsalted butter. Watch it melt and listen for the first crackle—this is the sound of butter beginning to brown. Once it turns a deep amber and smells nutty, remove from heat and set aside to cool slightly. This step is the foundation of the cookie’s flavor; skip it and you lose the caramelized depth.
- In a large mixing bowl, whisk together 2 cups all‑purpose flour, 1 teaspoon baking soda, and 1 teaspoon sea salt. The dry mix ensures even distribution of leavening and prevents clumps. If you prefer a slightly thicker cookie, reduce the flour by a tablespoon.
- In a separate bowl, cream 1 cup softened butter with ½ cup brown sugar and ½ cup white sugar until light and fluffy. Use a hand mixer or stand mixer on medium speed. This process incorporates air, giving the cookies a light bite. If you rush this step, the cookies will be dense.
- Add the browned butter to the creamed mixture. Stir until fully incorporated. The buttery mixture should feel silky and slightly glossy. This is the moment of truth—if you see any lumps, the butter wasn’t fully mixed and will affect texture.
- Add 1 teaspoon vanilla extract to the wet mixture, mixing until just combined. The vanilla lifts the overall flavor profile; too much can overpower the chocolate. If you prefer a hint of citrus, a few drops of lemon zest can be a playful twist.
- Gradually fold in the dry mixture, mixing just until the dough comes together. Be careful not to overmix; the dough should be shaggy and slightly sticky. Overmixing will activate gluten too much, resulting in tough cookies.
- Fold in 1 cup of chocolate chips, ensuring they’re evenly distributed. The chips should be evenly spaced to avoid clumps. If you want a crunchier cookie, reserve a few chips to sprinkle on top before baking.
- Cover the dough with plastic wrap and chill for at least 30 minutes. Chilling firms the dough, making it easier to handle and preventing excessive spreading. If you’re short on time, you can bake immediately, but the cookies will be flatter.
- Preheat the oven to 350°F (175°C). Line baking sheets with parchment paper or silicone mats. A properly lined sheet ensures even baking and easy cleanup.
- Drop rounded tablespoons of dough onto the prepared sheets, spacing them 2 inches apart. The spacing allows the cookies to spread without merging. For a uniform look, use a cookie scoop.
- Bake for 12–14 minutes, or until the edges are golden brown and the centers have set but still look slightly undercooked. This will give you a chewy center that melts in your mouth. If you bake longer, the cookies become crispier.
- Remove from oven and let the cookies sit on the sheet for 5 minutes. This resting period allows the structure to set, preventing cracks. Then transfer to a wire rack to cool completely.
That's it— you did it. But hold on, I've got a few more tricks that'll take this to another level...
Insider Tricks for Flawless Results
The Temperature Rule Nobody Follows
Keep the dough cold. A warm dough spreads too much and loses its caramelized edges. If you notice the dough softening after chilling, let it sit in the fridge for another 15 minutes before scooping.
Why Your Nose Knows Best
Smell the dough before baking. It should carry a nutty, buttery aroma. If it smells like raw butter, you didn’t brown it enough. This simple test ensures the flavor profile is on point.
The 5‑Minute Rest That Changes Everything
After baking, let the cookies rest on the sheet for exactly five minutes. This short pause lets the steam inside redistribute, preventing cracks and keeping the center moist. It’s a small step that makes a big difference.
Use a Silicone Mat for Even Baking
Silicone baking mats provide consistent heat distribution, preventing the edges from burning while the centers remain soft. If you don’t have a mat, parchment paper works fine but may cause uneven edges.
Add a Touch of Espresso Powder
A teaspoon of espresso powder enhances the chocolate’s depth without adding a coffee flavor. Sprinkle it into the dry mix before folding in the wet ingredients. It’s a classic trick that elevates any chocolate cookie.
Creative Twists and Variations
This recipe is a playground. Here are some of my favorite ways to switch things up:
Almond Crunch
Add ½ cup chopped toasted almonds to the dough. The crunch complements the chewy center, and the almond butter flavor pairs beautifully with the brown butter.
Sea Salt & Pretzel
Replace half of the chocolate chips with mini pretzel pieces and sprinkle extra sea salt on top before baking. The salty crunch contrasts the sweet chocolate and buttery base.
Cocoa Powder Swirl
Stir 1 tablespoon unsweetened cocoa powder into the wet mixture for a richer chocolate flavor. The dough will have a subtle chocolate hue, making the cookies look as good as they taste.
Maple‑Brown Butter
Swap the brown sugar for maple syrup in the creaming step. The maple adds a warm, caramelized note that deepens the butter’s nutty flavor.
Pumpkin Spice
Add ½ teaspoon pumpkin pie spice to the dry mix. The spices add warmth and a hint of autumn, making the cookies perfect for fall gatherings.
Chocolate‑Dipped Finish
After cooling, dip half of each cookie in melted dark chocolate and sprinkle with sea salt. The glossy finish and extra chocolate layer turn these into show‑stopping treats.
Storing and Bringing It Back to Life
Fridge Storage
Store cookies in an airtight container at room temperature for up to 5 days. The airtight seal preserves the buttery freshness and prevents the cookies from drying out.
Freezer Friendly
Place cookies in a freezer‑safe bag and freeze for up to 3 months. When you’re ready to enjoy, let them thaw at room temperature for 20 minutes before reheating.
Best Reheating Method
Reheat frozen or stale cookies in a preheated oven at 300°F (150°C) for 8 minutes, or until warm. Add a tiny splash of water (a teaspoon per batch) before reheating to steam the cookies back to perfection, restoring that chewy center.