The first time I tried to recreate the campfire classic of gooey marshmallows, melted chocolate, and that unmistakable graham cracker crunch, I was halfway through a disaster. The batter had thickened into a dense, unyielding mass that clung to the pan like a stubborn stain, and the marshmallows had popped in a way that made my kitchen smell like burnt sugar. I stared at the mess, feeling the weight of a thousand “what ifs” as the clock ticked toward midnight. That night, I made a promise to myself: I would engineer a version of the s’more that would make my friends say, “I dare you to taste this and not go back for seconds.”
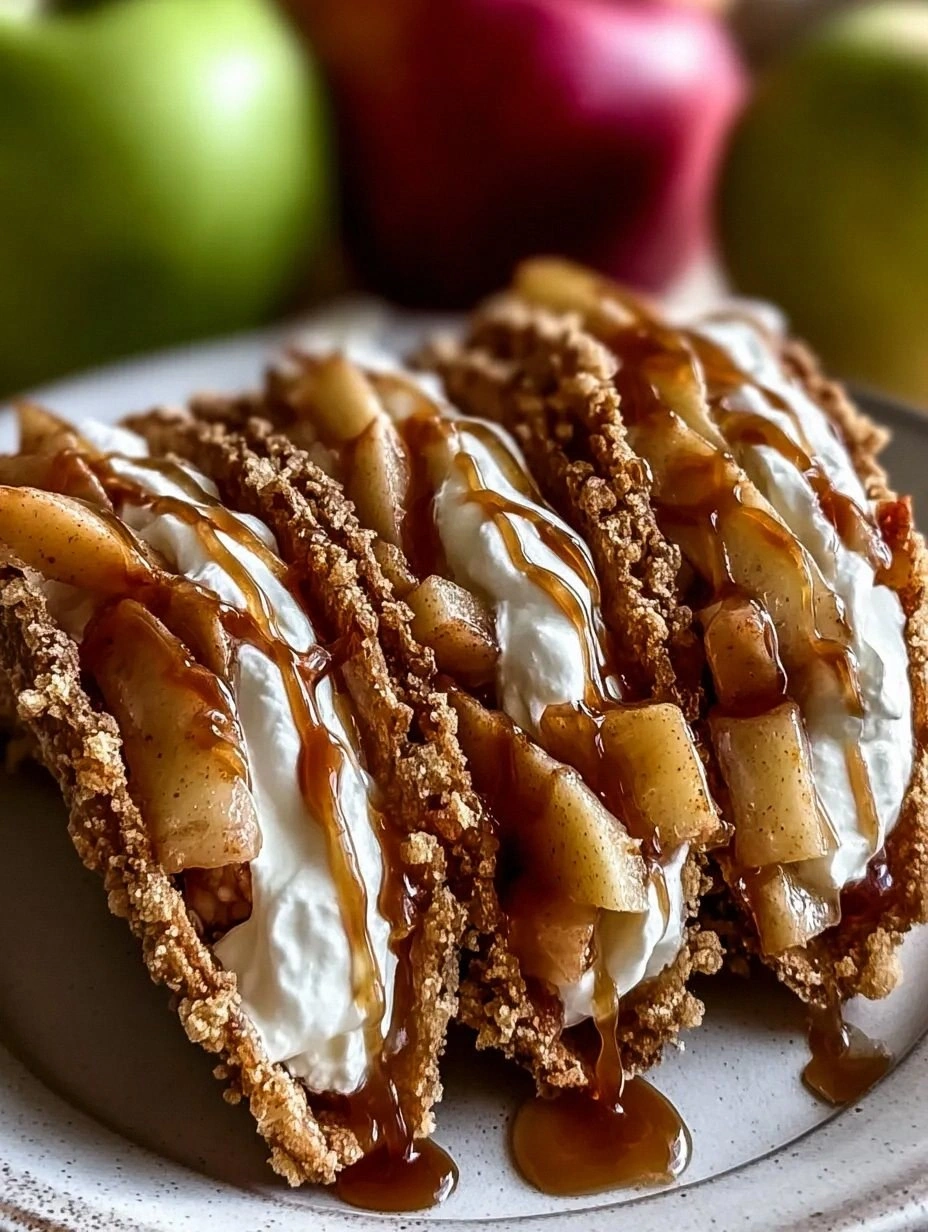
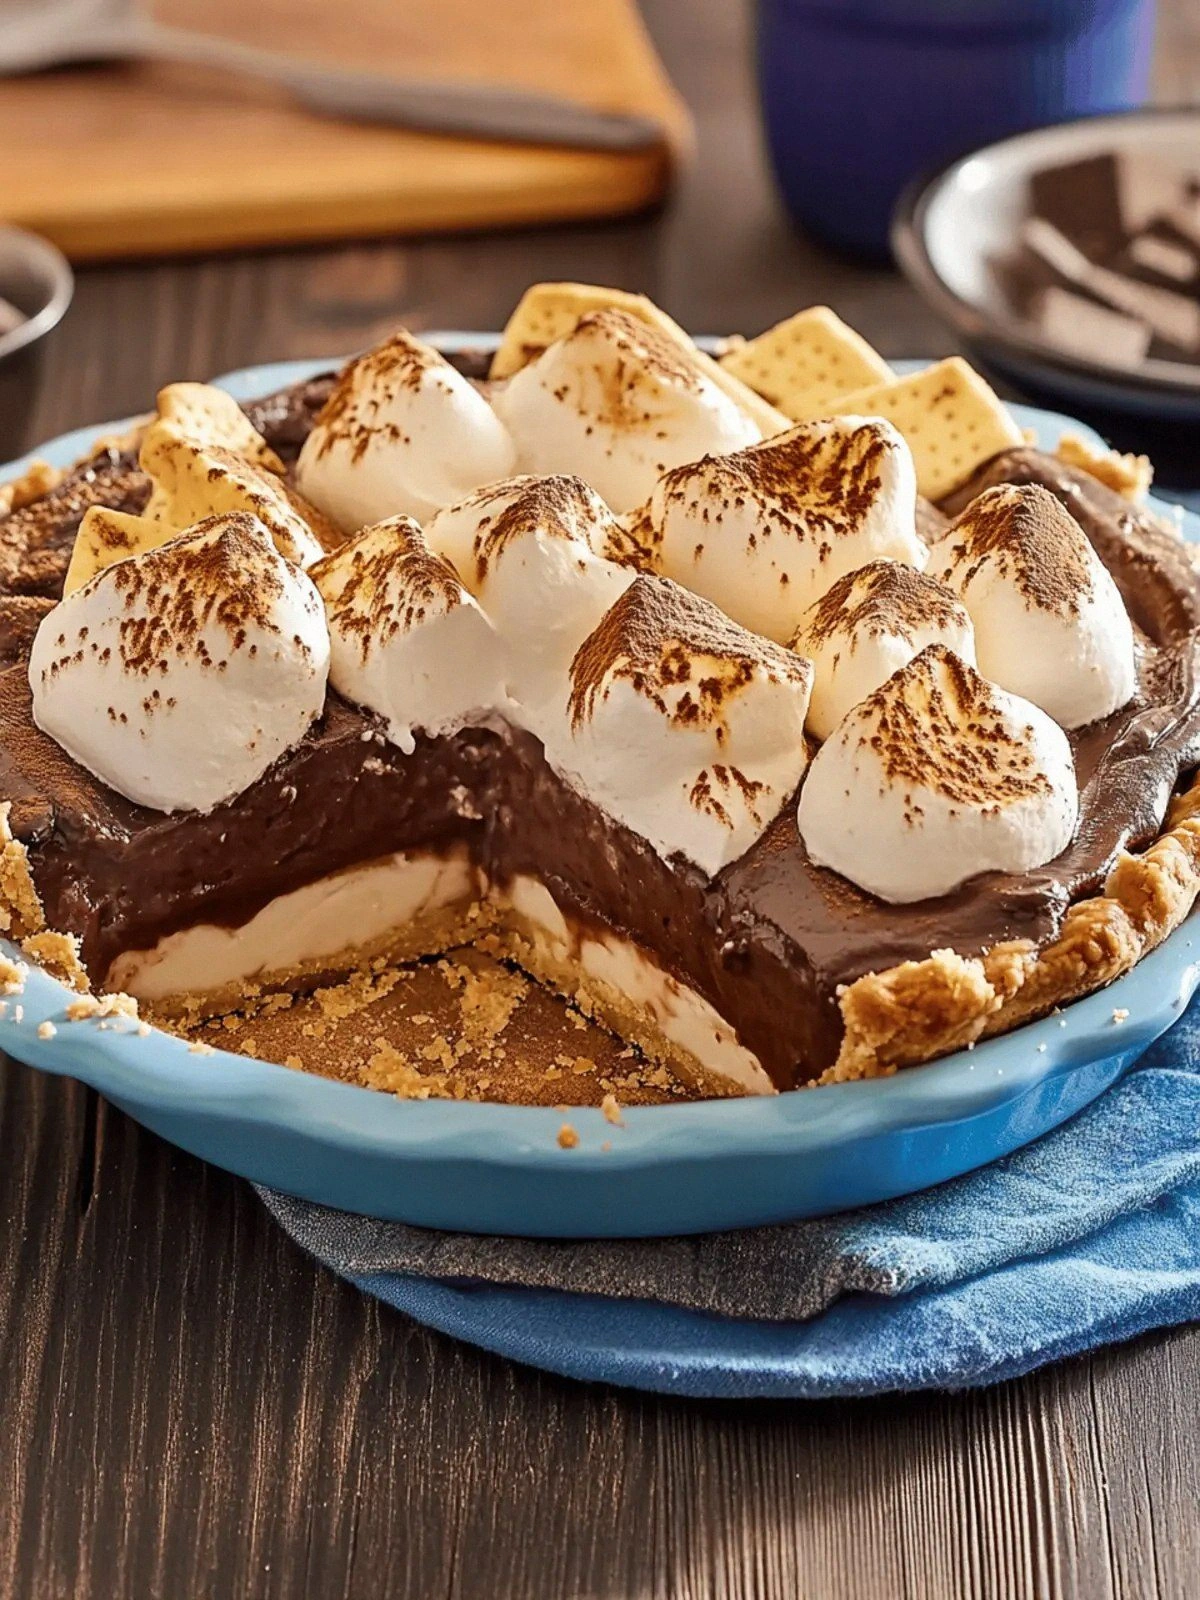
Fast forward a few weeks, and I’ve perfected a recipe that marries the nostalgic simplicity of a campfire treat with the refined technique of a pastry chef. The crust is a buttery, caramelized graham base that crunches delightfully under the first bite, while the filling glistens like a chocolate‑lava river, and the marshmallows rise to a golden, airy peak. The result? A dessert that feels like a warm hug, yet has the sophistication of a gourmet chocolate mousse. I’ve named it “Irresistible S’mores Pie with Creamy Chocolate Bliss” because that’s exactly what it delivers.
Picture yourself pulling this pie out of the oven, the whole kitchen smelling incredible, the steam curling like a sweet cloud. The crust has a faint, toasted aroma that hints at the subtle caramelization from the butter and sugar. The chocolate filling bubbles with a faint, almost imperceptible sigh as it sets, while the marshmallows sit atop, perfectly toasted, their edges crisping like thin ice. The first forkful melts in your mouth, releasing a cascade of chocolate, toasted graham, and sweet marshmallow that feels like a summer sunset on a spoon.
Let me walk you through every single step — by the end, you’ll wonder how you ever made it any other way. I’ll share the exact techniques that elevate this from a simple pie to a showstopper, the little hacks that save time, and the sensory checkpoints that guarantee perfection. Whether you’re a seasoned baker or a kitchen novice, this recipe will become your new go‑to for parties, holidays, or a cozy night in. So grab your apron, and let’s dive into the sweet science of the ultimate s’more.
What Makes This Version Stand Out
- Flavor: The graham cracker base is infused with a subtle caramelization from butter and sugar, providing depth that vanilla and chocolate alone can’t match. This base sets the stage for a layered taste experience that evolves from crunchy to gooey.
- Texture: The combination of a crisp crust, silky chocolate custard, and airy marshmallows creates a multi‑sensory mouthfeel. The contrast between the crunchy edges and the molten center feels almost cinematic.
- Ingredient Quality: Using high‑grade semi‑sweet chocolate and fresh whole milk elevates the dish from ordinary to extraordinary. The chocolate’s cocoa content melts smoothly, while the milk adds a velvety richness.
- Make‑ahead Potential: This pie can be assembled up to 24 hours in advance. The custard sets in the fridge, and the marshmallows can be toasted just before serving, keeping the texture pristine.
- Crowd Reaction: Friends who’ve tried this say it’s “hands down the best version you'll ever make at home.” The combination of classic campfire flavors with a refined finish makes it a conversation starter.
- Simplicity: Despite its layered complexity, the recipe requires only one pan and a few straightforward steps. No fancy equipment or hard‑to‑find ingredients.
- Versatility: The base can be swapped for a graham cracker cookie crust or a chocolate cookie crust for a different flavor profile. The filling can be tweaked with different chocolate types.
- Visual Appeal: The golden crust, glossy chocolate, and toasted marshmallow top create a striking presentation that’s Instagram‑ready.
Alright, let's break down exactly what goes into this masterpiece…
Inside the Ingredient List
The Flavor Base
The graham cracker crumbs are the foundation that carries the entire pie’s flavor profile. They provide a subtle, slightly sweet, and buttery backbone that balances the richness of the chocolate. If you skip them, you lose that essential crunch that gives the pie its signature “s'more” bite. For a twist, try adding a pinch of ground cinnamon or nutmeg to the crumbs for a warm, spiced undertone.
The Texture Crew
Butter, sugar, and cornstarch work together to create a custard that’s silky yet set. The melted butter introduces a buttery depth, while the sugar ensures a balanced sweetness that doesn’t overpower the chocolate. Cornstarch is the secret to a smooth, thickened custard that coats the back of a spoon without being heavy. If you’re vegan, substitute the butter with dairy‑free butter and use a plant‑based milk for a similar mouthfeel.
The Unexpected Star
Whole milk is the unsung hero that adds a creamy, velvety texture to the custard. Its fat content gives the filling a luxurious mouthfeel that pure chocolate alone can’t achieve. Skipping milk would result in a thinner, less cohesive custard. If you prefer a richer version, use heavy cream instead of whole milk; just reduce the cornstarch slightly to prevent over‑thickening.
The Final Flourish
The marshmallows are the crowning glory that ties the pie together. They provide that classic, airy sweetness and a toasted, caramelized exterior when warmed. The semi‑sweet chocolate bar, melted into the custard, adds depth and a slightly bitter counterbalance to the sweet marshmallows. If you’re feeling adventurous, try a dark chocolate bar for a more complex flavor profile.
Everything's prepped? Good. Let's get into the real action…
The Method — Step by Step
- Step 1: Prepare the crust. In a bowl, combine the graham cracker crumbs, melted butter, sugar, cornstarch, and a pinch of kosher salt. Stir until the mixture resembles wet sand. Press the crumb mixture firmly into the bottom and up the sides of a 9‑inch pie pan. Chill the crust in the refrigerator for 15 minutes to set the structure. This step ensures a firm base that won’t collapse under the custard.
- Step 2: Melt the chocolate. Break the 8 ounces of semi‑sweet chocolate into small pieces and melt it over a double boiler or in the microwave, stirring every 30 seconds until smooth. Be careful not to over‑heat; chocolate that’s too hot can seize. Once melted, set aside to cool slightly. This will give your custard a silky, glossy texture.
- Step 3: Whisk the custard. In a saucepan, whisk together the whole milk, egg yolks, vanilla paste, and a splash of water to loosen the mixture. Heat over medium heat, stirring constantly, until the mixture thickens and coats the back of a spoon. This is the classic custard stage where the eggs bind the milk into a creamy base.
- Step 4: Combine chocolate and custard. Remove the saucepan from heat and slowly pour the melted chocolate into the custard, whisking vigorously to prevent lumps. The mixture should be a deep, glossy brown. This step creates the creamy chocolate layer that will sit atop the crust.
- Step 5: Assemble the pie. Pour the chocolate custard into the chilled crust, smoothing the top with a spatula. Gently fold in the marshmallows, ensuring they are evenly distributed. The marshmallows should be nestled into the custard, not just on top, for a uniform melt.
- Step 6: Chill for set. Cover the pie with plastic wrap, pressing it against the surface to prevent a skin from forming. Refrigerate for at least 2 hours, or overnight, until the custard has fully set and the marshmallows have softened. This step allows the flavors to meld and the texture to firm up.
- Step 7: Toast the marshmallows. Preheat your oven’s broiler on high. Remove the pie from the fridge and place it on a baking sheet. Broil for 2–3 minutes, watching carefully, until the marshmallow tops are golden and slightly blistered. This adds a caramelized crunch that echoes campfire s’mores.
- Step 8: Serve. Let the pie rest for a minute to allow the heat to distribute. Slice with a warm knife for clean cuts. Serve immediately, perhaps with a drizzle of additional melted chocolate or a dusting of powdered sugar for an extra touch.
That's it — you did it. But hold on, I've got a few more tricks that'll take this to another level. From the subtle caramelization of the crust to the velvety custard, every element is designed to wow. Let’s dive into insider tips that will make your pie even more unforgettable.
Insider Tricks for Flawless Results
The Temperature Rule Nobody Follows
Many bakers bake the crust at a high temperature, but for this pie, keep it at 350°F (175°C) for just 10 minutes. This low, slow bake allows the crumbs to set without burning, preserving that delicate graham flavor. If you’re impatient, you can skip baking entirely, but the crust will be softer and less stable.
Why Your Nose Knows Best
Before you set the pie aside, give it a sniff. A faint, toasted aroma indicates the crust is perfectly browned. If it smells raw or sweet, give it another minute in the oven. Your nose is a reliable gauge for doneness.
The 5‑Minute Rest That Changes Everything
After broiling the marshmallows, let the pie rest for five minutes before slicing. This brief pause allows the heat to distribute evenly, preventing a sudden rush of hot custard that could burn your mouth. It also gives the marshmallows a chance to set slightly, giving you that satisfying bite.
Use a Warm Knife for Clean Cuts
A warm knife, slightly heated in hot water and then dried, cuts through the custard and crust without tearing. This technique ensures neat slices that showcase the layers. A cold knife can crush the delicate custard, leading to uneven portions.
Add a Splash of Water Before Reheating
If you need to reheat the pie, add a tiny splash of water to the custard before microwaving. The water steams the custard, preventing it from drying out and maintaining its silky texture. Microwave in short bursts, checking frequently.
Keep the Crust Crumbly
After baking, let the crust cool completely before adding the custard. A warm crust can cause the custard to become too liquid, leading to a soggy base. A cool crust preserves the crunch you’re after.
Creative Twists and Variations
This recipe is a playground. Here are some of my favorite ways to switch things up:
Nutty Bliss
Add a handful of toasted pecans or walnuts to the crust for a crunchy, nutty undertone. The nuts complement the chocolate’s richness and add a delightful textural contrast. They also bring a subtle, buttery flavor that elevates the entire pie.
Caramel Swirl
Stir in a drizzle of caramel sauce into the chocolate custard before pouring it into the crust. The caramel adds a sweet, buttery note that pairs beautifully with the marshmallows. This variation is perfect for those who love a bit of extra decadence.
Mint Chocolate Dream
Replace the vanilla bean paste with a splash of mint extract. The mint provides a refreshing contrast to the chocolate, creating a minty s’more that feels like a cool breeze on a hot day. Serve with fresh mint leaves for an extra pop.
Dark Chocolate Variation
Use a high‑cocoa dark chocolate instead of semi‑sweet for a richer, slightly bitter flavor profile. The bitterness balances the marshmallow’s sweetness, creating a more sophisticated palate. Dark chocolate also gives the custard a deeper hue.
Coconut Twist
Replace the whole milk with coconut milk and sprinkle toasted coconut flakes on top after broiling. The coconut adds a tropical aroma and a chewy texture that pairs well with the marshmallows. This version is a great way to bring a beach vibe to your dessert.
Coffee‑Infused S’more
Stir a teaspoon of instant espresso powder into the chocolate custard for a subtle coffee kick. The espresso enhances the chocolate’s depth and gives the pie a warm, roasted flavor that’s reminiscent of a cozy café. It’s an excellent choice for coffee lovers.
Storing and Bringing It Back to Life
Fridge Storage
Store the assembled pie in the refrigerator for up to 48 hours. Keep it in a tightly sealed container to prevent it from absorbing odors from other foods. When ready to serve, let it sit at room temperature for 10 minutes to soften slightly.
Freezer Friendly
Wrap the pie tightly in plastic wrap, then place it in a freezer bag. It can be frozen for up to 2 weeks. Thaw overnight in the refrigerator before reheating. The custard will retain its silky texture, and the marshmallows will remain soft.
Best Reheating Method
To reheat, preheat your oven to 350°F (175°C). Place the pie on a baking sheet and warm for 10–12 minutes, or until the custard is hot. Add a splash of water to the custard before microwaving to keep it moist. The result is a warm, melty treat that feels like a fresh campfire dessert.