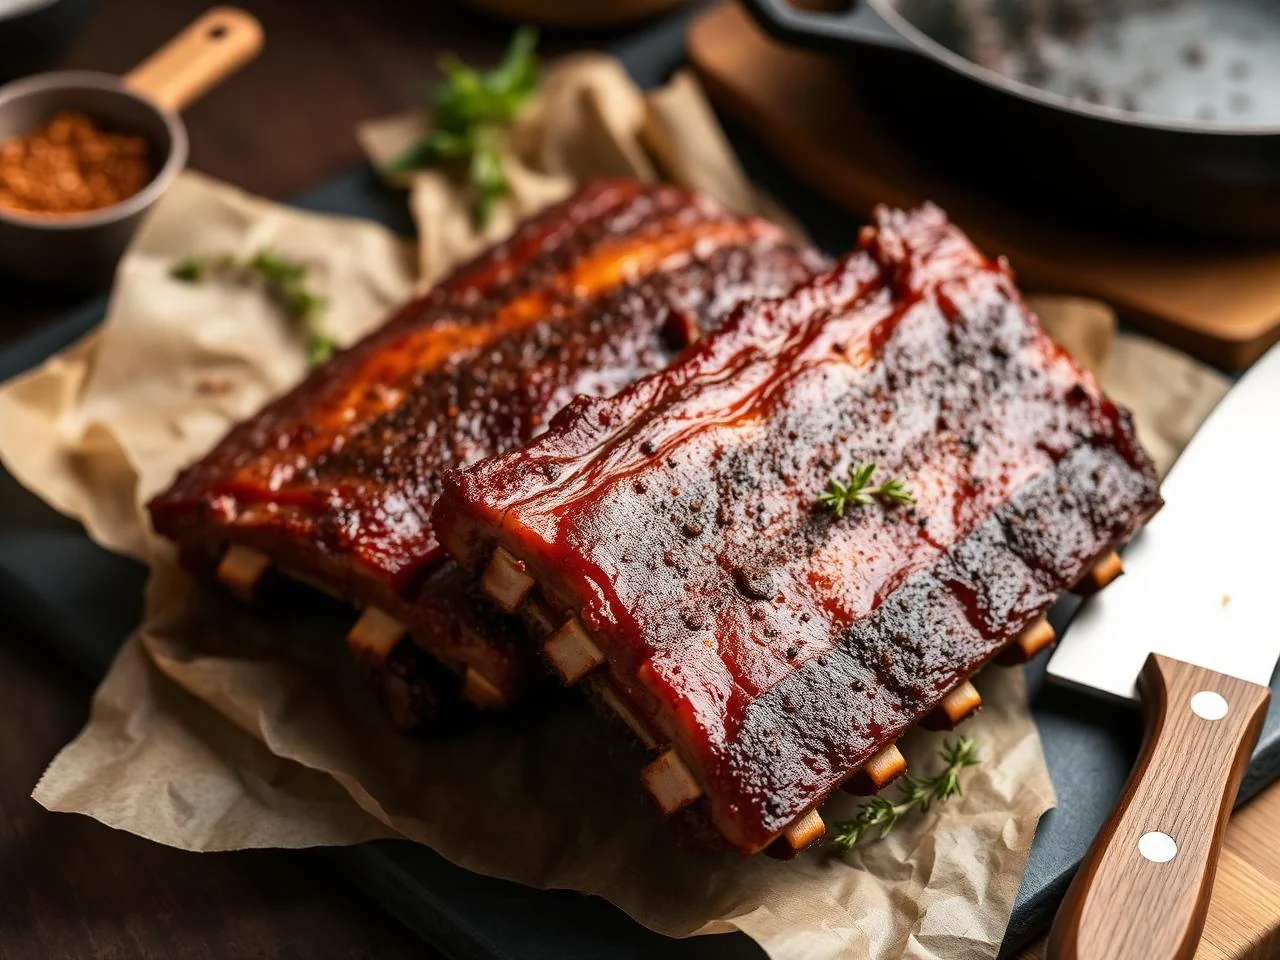
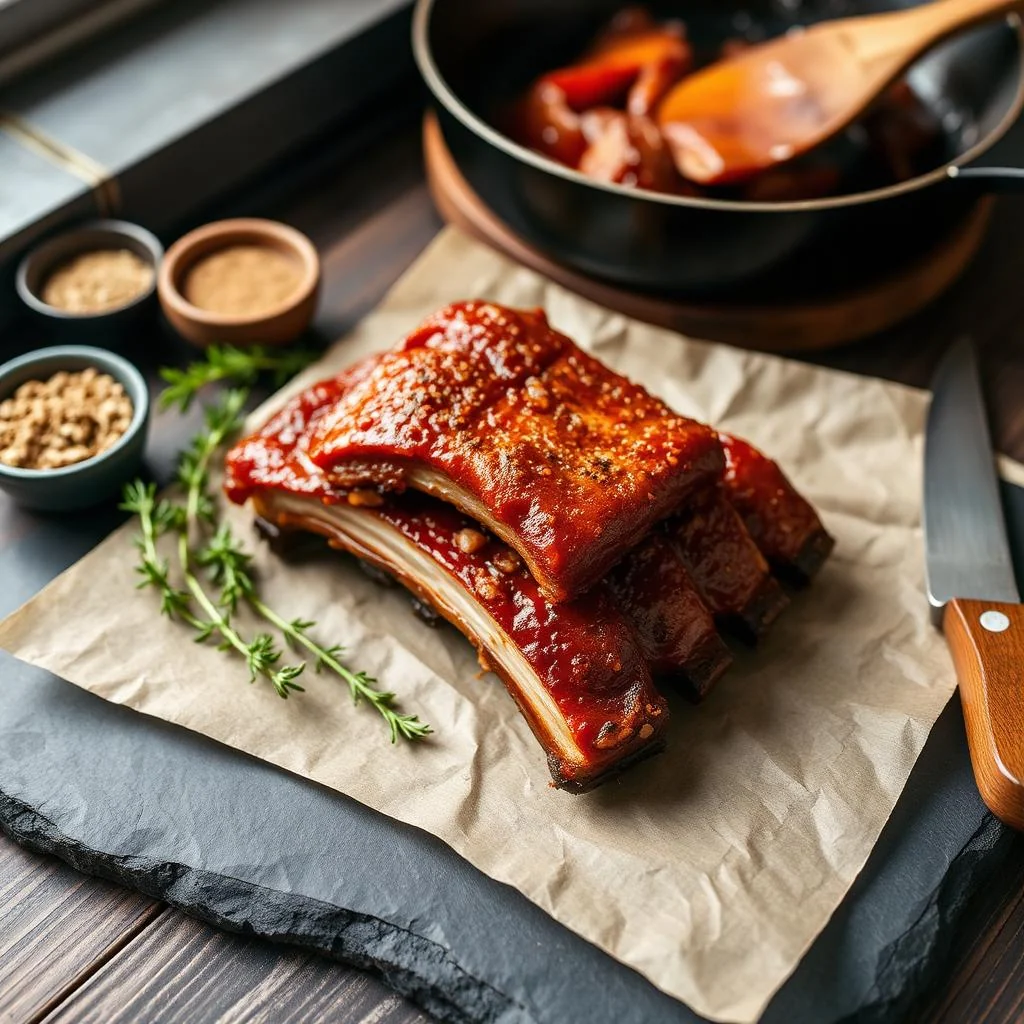
Dry Rubbed Ribs
I still remember the first time I made dry rubbed ribs. It was a summer afternoon, and the smell of smoky pork filled the entire neighborhood. My family and friends couldn't get enough of the tender, flavorful ribs, and I knew I had found a recipe that would become a staple in our household.
As a home cook, I've always been fascinated by the art of slow cooking. There's something magical about taking a tough cut of meat and turning it into a tender, juicy masterpiece. And when it comes to dry rubbed ribs, the key is to cook them low and slow, allowing the connective tissues to break down and the flavors to meld together.
One of the things I love about this recipe is its simplicity. With just a few ingredients and some basic equipment, you can create a dish that's sure to impress your friends and family. And the best part? It's incredibly versatile - you can serve it as a main course, or as a snack at your next party.
So, what makes this recipe special? For starters, the dry rub is a game-changer. Made with a blend of spices, herbs, and brown sugar, it adds a depth of flavor that's hard to beat. And by cooking the ribs low and slow, you get a tender, fall-off-the-bone texture that's just perfect.
Whether you're a seasoned cook or just starting out, this recipe is perfect for anyone who loves smoky, comforting food. So, let's get started and make some delicious dry rubbed ribs!
Why You’ll Love This Recipe
- Easy to make and requires minimal supervision
- Perfect for a crowd, whether it's a party or a family gathering
- Can be made ahead of time, making it perfect for busy weeknights
- Incredibly versatile and can be served with a variety of sides
- Budget-friendly and uses affordable ingredients
- Makes a great leftovers, perfect for sandwiches or salads
Why This Recipe Works
The key to making great dry rubbed ribs is to cook them low and slow. By cooking the ribs at a low temperature for a long period of time, you allow the connective tissues to break down, making the meat tender and juicy. This is especially important for ribs, which can be tough and chewy if not cooked properly.
Another important factor is the dry rub itself. Made with a blend of spices, herbs, and brown sugar, it adds a depth of flavor that's hard to beat. The brown sugar helps to balance out the heat from the spices, while the herbs add a fresh, aromatic flavor.
Finally, it's all about the resting time. After cooking the ribs, it's essential to let them rest for at least 10-15 minutes before serving. This allows the juices to redistribute, making the meat even more tender and flavorful.
By following these simple steps, you can create a dish that's sure to impress your friends and family. So, let's take a closer look at the recipe and get started!
Ingredients You’ll Need
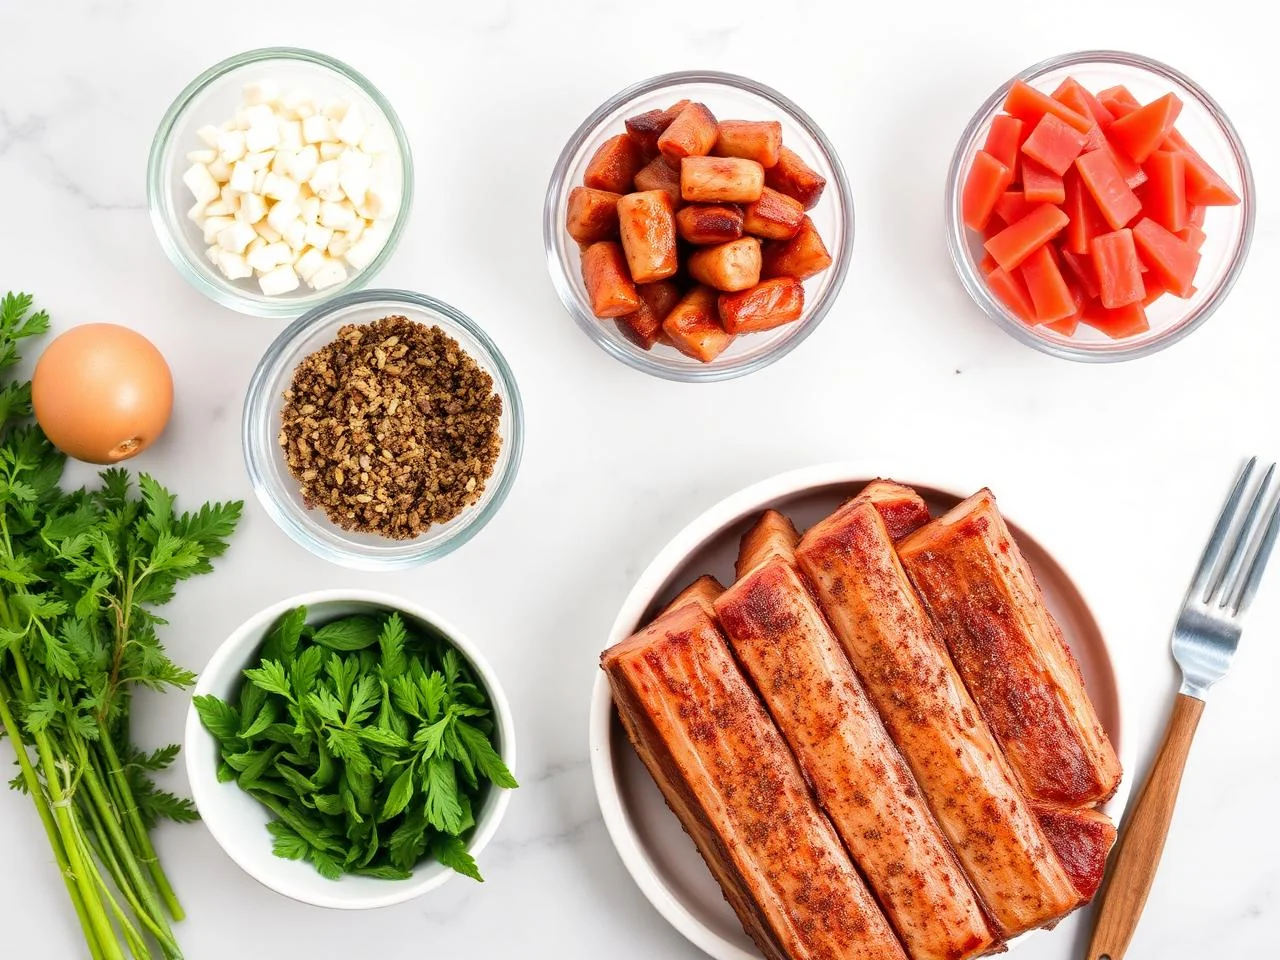
When it comes to making dry rubbed ribs, the ingredients are just as important as the technique. You'll need a few basic pantry staples, including brown sugar, smoked paprika, and garlic powder. You'll also need some fresh herbs, such as thyme and rosemary, to add a fresh, aromatic flavor.
One of the most important ingredients is the ribs themselves. Look for pork ribs that are meaty and have a good balance of fat and lean meat. You can use either baby back ribs or spare ribs, depending on your preference.
- 2 lbs (900g) pork ribsLook for meaty ribs with a good balance of fat and lean meat. You can use either baby back ribs or spare ribs, depending on your preference.
- 1/4 cup (60g) brown sugarBrown sugar adds a depth of flavor and helps to balance out the heat from the spices. You can use either light or dark brown sugar, depending on your preference.
- 2 tbsp (30g) smoked paprikaSmoked paprika adds a smoky flavor that's perfect for ribs. You can use either sweet or hot smoked paprika, depending on your preference.
- 1 tsp (5g) garlic powderGarlic powder adds a savory flavor that complements the other spices. You can use either regular or roasted garlic powder, depending on your preference.
- 1 tsp (5g) onion powderOnion powder adds a savory flavor that complements the other spices. You can use either regular or roasted onion powder, depending on your preference.
- 1 tsp (5g) saltSalt enhances the flavor of the other spices and helps to bring out the natural flavor of the ribs. You can use either regular or kosher salt, depending on your preference.
- 1/2 tsp (2g) black pepperBlack pepper adds a sharp, peppery flavor that complements the other spices. You can use either regular or freshly ground black pepper, depending on your preference.
- 1/4 cup (15g) chopped fresh thymeFresh thyme adds a fresh, aromatic flavor that complements the other spices. You can use either regular or lemon thyme, depending on your preference.
- 1/4 cup (15g) chopped fresh rosemaryFresh rosemary adds a piney, herbaceous flavor that complements the other spices. You can use either regular or lemon rosemary, depending on your preference.
- 2 tbsp (30g) olive oilOlive oil helps to keep the ribs moist and adds a rich, fruity flavor. You can use either regular or extra-virgin olive oil, depending on your preference.
Equipment You’ll Need
How to Make Dry Rubbed Ribs
- 1Preheat your oven to 275°F (135°C). Line a large baking sheet with aluminum foil, leaving enough overhang to wrap the ribs.
- 2In a small bowl, mix together the brown sugar, smoked paprika, garlic powder, onion powder, salt, and black pepper.
- 3Remove the membrane from the back of the ribs, if it's still intact. This will help the rub penetrate the meat and make the ribs more tender.
- 4Apply the dry rub to the ribs, making sure to coat them evenly. You can use your hands or a spatula to apply the rub, depending on your preference.
- 5Place the ribs on the prepared baking sheet, bone side down. Drizzle with olive oil and sprinkle with chopped thyme and rosemary.
- 6Fold the foil over the ribs, making sure to seal the edges tightly. This will help to trap the heat and moisture, making the ribs more tender and flavorful.
- 7Bake the ribs for 2 1/2 hours, or until they reach an internal temperature of 160°F (71°C). You can check the temperature by inserting an instant-read thermometer into the thickest part of the meat.
- 8After 2 1/2 hours, remove the ribs from the oven and carefully unwrap the foil. If the ribs are not yet tender, you can return them to the oven for an additional 30 minutes.
- 9Increase the oven temperature to 400°F (200°C). Return the ribs to the oven and bake for an additional 10-15 minutes, or until they're nicely browned and caramelized.
- 10Remove the ribs from the oven and let them rest for 10-15 minutes before serving. This will help the juices to redistribute, making the meat even more tender and flavorful.
- 11To serve, slice the ribs into individual portions and serve with your favorite sides, such as coleslaw, baked beans, or grilled vegetables.
Expert Tips
- Make sure to remove the membrane from the back of the ribs, as this will help the rub to penetrate the meat and make the ribs more tender.
- Use a meat thermometer to check the internal temperature of the ribs, as this will ensure that they're cooked to a safe temperature.
- Don't overcook the ribs, as this will make them dry and tough. Instead, aim for a tender, fall-off-the-bone texture.
- Let the ribs rest for 10-15 minutes before serving, as this will help the juices to redistribute and make the meat even more tender and flavorful.
- Experiment with different seasonings and spices to find the flavor combination that you like best.
- Consider using a slow cooker to cook the ribs, as this will make the process even easier and more convenient.
Common Mistakes to Avoid
- Not removing the membrane from the back of the ribs, which can make them tough and chewy.
- Overcooking the ribs, which can make them dry and tough.
- Not letting the ribs rest before serving, which can make them less tender and flavorful.
- Not using a meat thermometer to check the internal temperature of the ribs, which can make them unsafe to eat.
- Not experimenting with different seasonings and spices, which can make the dish less flavorful and interesting.
- Not using a large enough baking sheet, which can make the ribs overlap and cook unevenly.
Variations and Substitutions
- Try using different types of wood chips, such as hickory or apple, to add a smoky flavor to the ribs.
- Experiment with different seasonings and spices, such as cumin or coriander, to add a unique flavor to the ribs.
- Consider using a sweet and sticky glaze, such as honey or brown sugar, to add a caramelized flavor to the ribs.
- Try using different types of meat, such as beef or lamb, to make a variation of the dish.
- Experiment with different cooking methods, such as grilling or braising, to add a unique texture and flavor to the ribs.
- Consider serving the ribs with a side of barbecue sauce, such as Kansas City-style or Carolina-style, to add a tangy and flavorful element to the dish.
What to Serve With Dry Rubbed Ribs
Serve the dry rubbed ribs with your favorite sides, such as coleslaw, baked beans, or grilled vegetables. You can also consider serving them with a side of barbecue sauce, such as Kansas City-style or Carolina-style, to add a tangy and flavorful element to the dish.
Some other ideas for sides include roasted potatoes, grilled corn on the cob, or a simple green salad. You can also consider serving the ribs as a snack or appetizer, paired with a side of chips or crackers.
Make-Ahead, Storage, Freezing and Reheating
To store the dry rubbed ribs, let them cool completely to room temperature. Then, wrap them tightly in plastic wrap or aluminum foil and refrigerate for up to 3 days.
To freeze the ribs, wrap them tightly in plastic wrap or aluminum foil and place in a freezer-safe bag. Frozen ribs can be stored for up to 3 months. To reheat, simply thaw the ribs overnight in the refrigerator and then bake in the oven at 300°F (150°C) for 10-15 minutes, or until heated through.
It's also possible to make the dry rub ahead of time and store it in an airtight container at room temperature for up to 6 months. Simply mix the ingredients together and store in a cool, dry place.
To reheat the ribs, you can also consider using a slow cooker. Simply place the ribs in the slow cooker and cook on low for 2-3 hours, or until heated through.
Frequently Asked Questions
What type of ribs is best for dry rubbing?
You can use either baby back ribs or spare ribs, depending on your preference. Baby back ribs are leaner and more tender, while spare ribs are meatier and more flavorful.
How long do I need to cook the ribs?
The cooking time will depend on the size and type of ribs you're using, as well as your personal preference for tenderness. As a general rule, cook the ribs for 2 1/2 hours at 275°F (135°C), or until they reach an internal temperature of 160°F (71°C).
Can I use a slow cooker to cook the ribs?
Yes, you can use a slow cooker to cook the ribs. Simply place the ribs in the slow cooker and cook on low for 6-8 hours, or until tender and flavorful.
How do I store the dry rubbed ribs?
To store the dry rubbed ribs, let them cool completely to room temperature. Then, wrap them tightly in plastic wrap or aluminum foil and refrigerate for up to 3 days. You can also freeze the ribs for up to 3 months.
Can I make the dry rub ahead of time?
Yes, you can make the dry rub ahead of time and store it in an airtight container at room temperature for up to 6 months. Simply mix the ingredients together and store in a cool, dry place.
What type of wood chips is best for smoking the ribs?
You can use a variety of wood chips to smoke the ribs, depending on your personal preference. Some popular options include hickory, apple, and cherry wood chips.
Can I use a gas grill to cook the ribs?
Yes, you can use a gas grill to cook the ribs. Simply preheat the grill to 275°F (135°C) and cook the ribs for 2 1/2 hours, or until they reach an internal temperature of 160°F (71°C).
How do I know when the ribs are done?
The ribs are done when they reach an internal temperature of 160°F (71°C) and are tender and flavorful. You can check the temperature by inserting an instant-read thermometer into the thickest part of the meat.
Ingredients
- 2 lbs (900g) pork ribs
- 1/4 cup (60g) brown sugar
- 2 tbsp (30g) smoked paprika
- 1 tsp (5g) garlic powder
- 1 tsp (5g) onion powder
- 1 tsp (5g) salt
- 1/2 tsp (2g) black pepper
- 1/4 cup (15g) chopped fresh thyme
- 1/4 cup (15g) chopped fresh rosemary
- 2 tbsp (30g) olive oil
Instructions
- Preheat your oven to 275°F (135°C). Line a large baking sheet with aluminum foil, leaving enough overhang to wrap the ribs.
- In a small bowl, mix together the brown sugar, smoked paprika, garlic powder, onion powder, salt, and black pepper.
- Remove the membrane from the back of the ribs, if it's still intact. This will help the rub penetrate the meat and make the ribs more tender.
- Apply the dry rub to the ribs, making sure to coat them evenly. You can use your hands or a spatula to apply the rub, depending on your preference.
- Place the ribs on the prepared baking sheet, bone side down. Drizzle with olive oil and sprinkle with chopped thyme and rosemary.
- Fold the foil over the ribs, making sure to seal the edges tightly. This will help to trap the heat and moisture, making the ribs more tender and flavorful.
- Bake the ribs for 2 1/2 hours, or until they reach an internal temperature of 160°F (71°C). You can check the temperature by inserting an instant-read thermometer into the thickest part of the meat.
- After 2 1/2 hours, remove the ribs from the oven and carefully unwrap the foil. If the ribs are not yet tender, you can return them to the oven for an additional 30 minutes.
- Increase the oven temperature to 400°F (200°C). Return the ribs to the oven and bake for an additional 10-15 minutes, or until they're nicely browned and caramelized.
- Remove the ribs from the oven and let them rest for 10-15 minutes before serving. This will help the juices to redistribute, making the meat even more tender and flavorful.
- To serve, slice the ribs into individual portions and serve with your favorite sides, such as coleslaw, baked beans, or grilled vegetables.